Testing Offers 101: From Red to Green

One of the toughest ongoing questions for affiliate marketers is, “How do I know when I’ve spent enough money testing an offer?”  Everybody has a different approach. There are a couple of truths that we need to look at.

  1. It is very rare to find a campaign that is profitable right out of the gate. I’m not saying it doesn’t happen, because it does, but it is very rare. In most cases you will need to test, optimize, test, optimize, then test some more before you really get it dialed in and profiting enough to make it worthwhile.
  2. Some campaigns will not work no matter how much testing and optimizing you do. There is nothing more frustrating than beating a dead horse.

Sound like a Catch 22? It all boils down to your tolerance for pain, or your willingness to lose (or I like to say “invest”) money in a campaign before it sees a profit. How do you test properly without blowing too much money, and still avoid dropping potentially profitable campaigns too early? Here’s what I like to do…

First of all, when you setup a campaign, you want to spend about 2x to 3x the payout of the offer for the initial test. If the offer payout is $5, then you want to spend approximately $10 – $15 on the initial test phase. This is the “gathering data” phase.
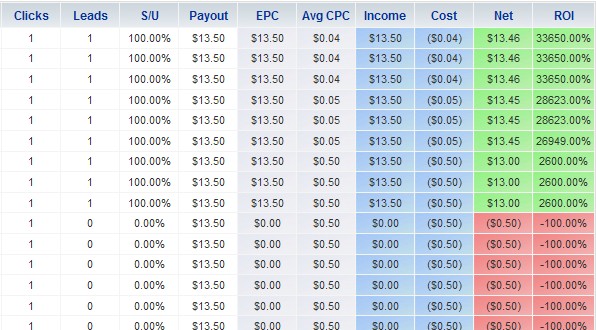
Stats

Green is good

Once you have done this, you will have some data to work with (assuming you’ve been tracking everything, with Tracking202 or a similar program). Here’s the type of questions you want to ask in order to evaluate your data:

Did it get any conversions at all? If so, what keywords / urls / referrers / ad copies / banners were they from? Did you make a profit? Would it be profitable if you bid on less keywords? Would it be profitable if you bid on more keywords for a cheaper price? The list goes on, but these questions should give you a start.

For me personally, after the initial testing phase, if I haven’t received any conversions at all, I usually dump the campaign. That’s -100% ROI, and that’s going to be hard to overcome without a drastically different strategy, and it’s probably not worth it. If you are anywhere from -50% ROI to 0% ROI, then you might be able to profit with optimization. Try using a landing page or direct linking (whichever you didn’t do the first time), try different ad copies, pictures, headlines, calls to action, etc. Use the data from the test to see what is working and what is not working.

However you got those conversions in the testing phase, focus on that precise set of circumstances and recreate them in greater volume. Once you understand how and why you got some conversions, you are well on your way to having an optimized and profitable campaign.

Now go make some money!

R.I.P. Facebook Ads – April 2010

Well we had a good run. When I first met you Facebook, you were just a kid. You didn’t know what the true potential of your platform was worth, and you let me put ads on you for cheap! Those were the days. We made lots of money together. But now, you are all grown up. You have decided that it’s not me, no, it’s you that’s changed. You think I’m a nice affiliate, but you would rather not take my ads and my money anymore. Where you are going to get advertising dollars from now, I’m not sure. But you must have someone better in mind because you certainly don’t want to hang out with the likes of me anymore.

All kidding aside, Facebook has effectively given the middle finger to affiliate marketers with its latest update to their advertising policy.  Let’s look at what was actually sent out to affiliates from Facebook, and I’ll do my best to translate…

Improving Ad Quality
Ad quality and user feedback have always been important considerations for Facebook Ads, and are significant factors in  determining which ads we accept and display on the site. We’ve recently taken a close look at the ads that drive the most negative feedback, and identified four key themes behind ads that are detrimental to the user experience. As a result, we’re strengthening our Advertising Guidelines in these key areas to ensure that all Facebook Ads meet our high quality standards.

Translation: “We have decided that we would rather piss off our advertisers than explain to our users that Facebook is a free-to-use, ad-driven website that they choose to visit.”

Unexpected User Experience
Advertised products may not generate any unanticipated user experience. This includes, but is not limited to:
1 Computer performance changes, such as the unexpected installation of any secondary software or the overlay of advertisements on the user’s browser or operating system
2 Unanticipated recurring charges
3 Undisclosed sale or distribution of requested user information. Any distribution of user information must be confirmed through
user consent.

This part is actually not that bad. I don’t disagree with the new guideline. Advertisers shouldn’t be messing with users’ computers.

Unclear Recurring End Product
Advertisements must be clear and straightforward in describing any recurring end product to the user. The advertised offer must directly match the service being sold, and ads should provide the user with a clear understanding of what he or she is purchasing.
Facebook Ads for products with recurring billing cycles should not:
1 Focus on an advertised “hook” without disclosing the core subscription-based service.
Example: “Take a quiz!” (for a service that includes ringtones, wallpaper, or other undisclosed services)
2 Position a subscription-based service as a single product or billing interval.
Example: ”Try now for $2.95” (for a service that includes monthly billing intervals)

Translation: “Advertising may no longer be phrased to try and excite the user, encouraging them to sign up. In fact, ad copy must now do everything possible to discourage the user from clicking the ad and, God forbid, signing up for the offer. We now know that our users are too stupid to make their own decisions, so we are going to decide for them what they should or should not do with their money.”

Unsubstantiated Claims
Ads must not include unsubstantiated claims. Ads must clearly represent the offer, company, product, or brand that is being advertised.
Unacceptable claims include, but are not limited to:
1 Unrealistic prices or rates.
Examples: “$0.50 LCD TVs,” “$10/month health insurance”
2 Use of current events or news reports to create false associations with the advertised product. Political events or images may not be used for an irrelevant commercial agenda.
Example: “Breaking News: Great car insurance rates”
3 Use of false qualifications to create a sense of relevancy
Example: “If you are right-handed, you qualify for low premiums”
4 Implication of dynamic ad content
Examples: “7 minutes remaining,” “only (3) available”
5 Implied knowledge or passing of user data
Examples: “See who searched for you,” “you have been chosen”

Translation: “Advertising must not be creative whatsoever. If it is worded in a way that makes a user want to click the ad, then it is probably not going to be allowed anymore. We now prefer to present them with a list of products and services resembling a page in the phone book, and if they happen to be looking for ‘Reasonably Priced But Not Too Cheap Health Insurance’ while they are browsing through pictures of their ex, then they will surely respond to that ad.”

Unacceptable Business Models
Ads will not be permitted in cases where a business model or practice is deemed unacceptable or contrary to Facebook’s overall advertising philosophy. Unacceptable business models include, but are not limited to:
1 Lead generation offers which sell or distribute a user’s information to larger extent than indicated by the landing page
2 Offers that require a user to complete several hidden steps or make additional purchases in order to receive the promised product
3 Offers that require the input of user information for complete access to offer or product details
4 Ads promoting deceptive recurring billing services
5 Downloadable software that may affect the user’s computer or browser performance in unexpected or undesirable ways

Translation: “No affiliate offers from any CPA network will ever be allowed again.”

So there you have it. Facebook has decided that it no longer needs the advertisers that are paying them to keep the doors open. I don’t know what their plans for the future are, but they certainly don’t include us.

PPV Network Review: DirectCPV

If you’ve read my other posts on PPV, you know I’m a fan of Media Traffic and their PPV network.  This is the place that 90% of the people I talk to start out with PPV.  That being said, there are other options out there.  A newer network that I heard about recently is DirectCPV.  Since I had a few people asking me about it, I decided to give it a test run to see how it stacks up to the other guys.

First of all, the interface may look familiar to you when you log in and setup a campaign.  This is due to the fact that DirectCPV is white labeling the CPView platform.  This does not mean that DirectCPV is the same thing as CPView, they have a different user base with the adware installed so it is a completely different network.

It is relatively simple to get a campaign set up with the interface, you put in your Landing Page url (affiliate link), give it a name, and then you add in at least one type of targeting (URL, keyword, or category).  I put in about 20 URLs from a quick Google search and decided to try out a couple keywords as well.  One thing to note here is that DirectCPV does not have anywhere near the number of adware users that some of the bigger networks have, so you might be a bit safer testing out new keywords here (keywords on the big networks can mean your whole budget gone in the blink of an eye).

I let it run for a few days and when I came back to check my stats (using Prosper202) I was pleasantly surprised that my campaign was profitable right off the bat.  It wasn’t a home run, but it did make money.  I decided to make a couple of minor tweaks at that point.  The first thing was checkout my Prosper202 to see what URLs were converting.  As is often the case, all the conversions were coming from one URL.  I noticed that some of them were coming from the Keyword that I had put in instead of the direct URL.  The problem with that is that the bid price for the Keyword was 0.08 (8 cents) and the bid for the direct URL was 0.01 (1 cent).  Simple fix there, I paused the Keyword and added the URL to my targeting.  After that the profits were decent.

The main gripe I have about the DirectCPV interface is that you have to click “Check Bid” on each URL individually to see if you are in 1st position.  Other networks have done this better, but you can take some of the hassle out of it by setting the bid mode to Auto and then setting it at 1st position.  This will automatically increase your bid if somebody is above you.  Also if you want to Geo Target your campaign, you have to do it after the campaign is setup, you can’t do it during the campaign creation.  This stumped me the first time.

Final word?  I like DirectCPV.  I think it’s worth a shot especially if you have a profitable campaign on another network that you are looking to expand.  It can also be good for testing out a new campaign to if it converts without blowing your budget since there is a smaller installed user base, there is less competition, and the bid prices start at 1 penny (at MT it is 1.5).  It doesn’t have as much traffic as the bigger guys, but from what I saw it can definitely be a good source to add to your repertoire.

If you signup through my affiliate link here you can get a $25 credit by using the promo code “BR25”.

Disclosure: http://cmp.ly/5

Scaling Campaigns With PPV

So if you’ve been following this little series of posts on marketing CPA offers with PPV, then hopefully you have setup a few campaigns, tested some things out, and perhaps even found a winning campaign or two.  I consider it a winner when it is profitable at all.  It might be making $100 a day or $10 a day, but you are in the black.  So what’s the next step?  Today we are going to talk about scaling your campaigns with PPV.

scale imgThe first step is going to be checking up on your results from the tracking that we have installed.  Before we scale a campaign we want to make sure to “trim the fat” from your initial group of keywords.  Using Prosper202, we have been tracking exactly which keywords / URLs your traffic has been coming from, and most importantly, which ones are converting for you.  My rule of thumb is pretty simple: I like to spend at least the amount of the offer’s payout per keyword / URL before deciding if it is a winner or a loser.  Now this can be adjusted depending on your tolerance for losing money, but if you’ve got an offer that pays $20 per lead, and you kill a keyword at $10 of spend, then you might be losing out because even if you spend $18 to make $20 it’s still a profit.  At times, if you are convinced that the campaign will be profitable but you are still tweaking your Landing Page or something, you can spend 2x the payout if you wish.  It’s up to you, I’m just giving you a good place to start.

Typically, what I find is that the #1 URL (the one getting you the largest amount of traffic) is not going to be profitable.  This is not a rule, it’s just a trend I’ve noticed on my campaigns.  For example, I was running a dating campaign and noticed that over 50% of my ad spend and traffic were coming from Match.com, but I hadn’t received a single conversion for that URL.  Since I had spent more than the payout (which was around $3), I paused Match.com.  The day after that my traffic went down drastically, but my conversions stayed about the same.  Guess what that meant?  That’s right, this campaign went from the red to the black overnight.

Once you have trimmed the fat, you are going to want to find more traffic for your offer.  There are two ways we can scale a PPV campaign.  The first one is obvious, to try to find more URLs.  This definitely works, but it can be more time consuming because the whole process starts all over again.  The easiest way to scale a profitable campaign is to copy it over the the other PPV networks.

Unlike PPC, where you know that if you are on Google you are hitting roughy 70% of the market by advertising there, with PPV each network has a different user base.  Zango, for example, installs their software when someone downloads a free Screensaver program, a toolbar, or some other PC tool.  On the other hand, TrafficVance installs their software when users play games from the GameVance website.  Do you think that those user groups are going to have some different people in them?  Absolutely.  This is why I would recommend unpausing all of your “losing” keywords and starting the trimming the fat process over again with each new PPV network.  Just because a URL didn’t convert on Zango doesn’t mean it won’t convert on TrafficVance, and vice versa.

Since there are five major PPV networks, this is going to give you lots of places to try out your campaigns until you have a good sized profitable campaign going.  Once you have done this, it’s time to start all over again and find a new winner!

Now go make some money.

Landing Pages For PPV

We all know that landing pages are a very important part of PPC marketing, but it is important to realize that they can have a huge effect on your PPV (Contextual) campaigns as well.  It seems like most people that start PPV are just doing it to direct link.  It is quite attractive to forget about all the variables except the offer and the URLs you are targeting, but you might be hurting yourself in the long run by doing this.

For example, I was experimenting with a ringtones campaign on Media Traffic.  I had about 1,000 URLs setup for my targets, and I decided to just start with direct linking by grabbing my Contextual Affiliate Link for the campaign (it was Ringtones.net at affiliate.com).  It started getting traffic immediately after I set it live, and before the day was out I had about 1,000 views (displays) on the offer.  To my dismay, there wasn’t a single lead showing!

What I didn’t realize initially is that Media Traffic only displays a 750 by 550 window for your ad.  Once I tested it, I realized that with the smaller window size a good portion of my ad was being obscured.  No wonder it wasn’t converting very well, they were only looking at half of a landing page!  I asked my account rep, and he confirmed that 750 by 550 is the max for MT as of now.  They are considering going to 800 by 600 (like Zango) sometime in the future.

This was what led me to create my first landing page for a PPV campaign.  The main reason was so that I could control exactly what was being viewed by the user when my ad pops up.  For starters, I made sure that the LP I created was exactly 750 by 550.  There would be nothing obscured this time.  Also, with PPV you don’t have to worry about putting a bunch of arbitrary text on the page, because there is no Quality Score issues or “User Experience” to worry about. The results to my initial LP were very promising.  I put it up on Friday night, and by the end of the day Sunday I had generated a 20% profit.  Not too shabby for the first try.

I quickly realized that one of the other benefits to having an LP is that you can tell how many people are clicking on your ad and determine your click-thru ratio.  If you are just direct linking to the Contextual link then you will lose all your click data, and impressions and leads alone are not enough info to tweak your campaign for the maximum profit.  On my page for example, I found out that I was getting about a 2.3% CTR.  The next step would be to play with the ad copy & images on the landing pages to get a higher CTR.  For PPV, it needs to be something eye-catching so they don’t just immediately close the window when it pops up.  Consider what page they are going to be viewing already when the ad pops up, and consider modeling it after the design of that page.

Whatever you do, testing is the key.  The right ad, displayed to the right people, is what creates a killer campaign.  Now go make some money!

How To Direct Link On Google

Direct linking on Google is a very popular way to test out affiliate offers to see how they convert before you devote the time to building a landing page.  To get started, you need to login to your Google AdWords account and start a new campaign.  You want to start a New Campaign with Keywords, not Placements.

Google Adwords Screenshot 2

Be sure to choose the proper country for the offer that you are promoting.  Google recently threw a monkey wrench into the works by setting the default countries to “United States and Canada”.  A lot of CPA offers will only accept traffic from one or the other, not both.  So pick your country and move on.

Google Adwords Screenshot 1

Creating your first ad will be the next step.  An ad consists of a Headline, 2 Description lines, a Display URL, and a Destination URL.  Go ahead and create a catchy headline and a descriptive ad containing a call to action, you want to get people to click on your ad now, not next week or next year.

The Display URL is an important step, and this is where we are going to trick Google into thinking that you already have a website built out for your offer.  Just do a normal Google search for your main keyword and pick a URL from one of the sites that appears in the organic (non-sponsored) links.  Make sure that the URL is not also advertised in the Sponsored Links on the right side of the page, because if it is, this trick won’t work.  Copy the URL and paste it into the Display URL box.

Now that you’ve got your Display URL, you want to use the exact same URL for your Destination URL.  I know what you are thinking, “But wait, how will I get paid for sending traffic to a site that isn’t mine?”.  Fear not, we are going to fix that in the next step.  This is just to get Google to approve your ad and hopefully assign you with a decent Quality Score.

So at this point your ad should look something like this:

Google Adwords Screenshot 6

Next you will choose your Keywords and enter your Daily Budget and CPC (Cost Per Click) bids.   Keyword generation and selection is a topic for an entire discussion in  itself, so I will just advise you to do your research before hand and have some keywords to get started with before you setup your campaign.  Google’s Free Keyword Tool is an excellent place to start.

We are almost done.  Go ahead and review everything and hit Save Campaign.  Now we need to do the final step to direct the traffic to your affiliate link instead of the website that you are using for your display URL.  Once you have saved the campaign, you will be taken to the campaign overview screen.  Click on the Keywords tab, and then check the box to select all of your keywords.  Once you have them all selected, click the Edit Keyword Settings button.

Google Adwords Screenshot 5

This will take you to a screen where you can input a new Destination URL for each keyword.  Go ahead and put your affiliate link into the first field, then hit the little down arrow button, this should copy the URL into all of the keywords for you.  So, for example, if your affiliate link is http://login.tracking101.com/ez/aasldkfjd (not a real link), it should look something like this:

Google Adwords Screenshot 7

UPDATE: Make sure that you remove the http:// from your affiliate link when you put it into this Destination URL box, because it will give you an Illegal Characters In URL error if you don’t.  There is a drop-down box to the left of where you put the link in that lets you select http:// or https:// for a secure affiliate link.  It defaults to http:// which is what most networks use.

Then just hit Save Changes, and you are good to go.  Congratulations, now you know how to get a direct-linked campaign approved on Google.

Now go make some money!